there are too many theories for how driving a remote car, I had used A servo motor to direct the car left and right instead of run the left motor and break the right motor, I see my way much more effective because of power loss issue, OK now first think first, we need to collect the Hardware of the joystick and the car like.
- Two motors
- Analog joystick
- Motor drive "H-bridge"
- Servo motor
- 4 small car wheels
- Hard plastic sheet
- Step down voltage
- Batteries
Building the car

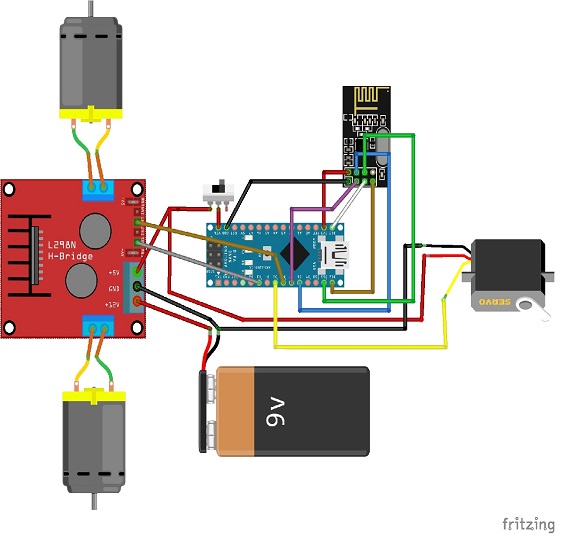
So as you see in the schematic below I have connected the H-bridge and NRF module with an Arduino the battery I use LIPO but you can use 9v bulk battery or something else but above 6 volts no less, after the connection upload the program and check the power reach for all the part after that build the sender.
to build a car body bring a plastic sheet in size 20cm long 15cm width, install the servo front middle of the car so I have for example between 6 cm from both sides then install the rest, connect power to the circuit so the servo will set itself I call it middle value then connect the front wheel that response for left and right movement.
You have two options first one is to take 5v from L298N Dual H Bridge or from a step down voltage, I highly recommend step down voltage.
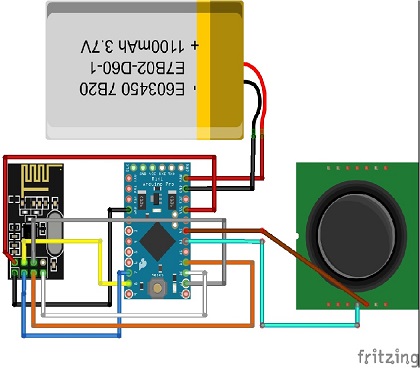
Now the sender which is much easier than the car itself just an Arduino and analog joystick and NRF24l01 to send the data, I had used Arduino mini because it's too small and work with single cell LIPO and it's low power consumption.

Note: ignore the red thing in the joystick that appears in the photo, that was a speed potentiometer I use it for my plane to set the speed of the motor.
after finishing from everything check the distance between the front wheel and plastic body sheet after twisting the servo left and right like the same in the photo below.
a video sample maybe you like it
Arduino code
Sender
#include <SPI.h>
#include "RF24.h"

RF24 myRadio (7, 8);
byte addresses[][6] = {"0"};

struct package
{
  int servo;
  int motor;
};


typedef struct package Package;
Package data;


void setup()
{
  Serial.begin(9600);
  delay(1000);
  myRadio.begin();
  myRadio.setChannel(115);
  myRadio.setPALevel(RF24_PA_MAX);
  myRadio.setDataRate( RF24_250KBPS ) ;
  myRadio.openWritingPipe( addresses[0]);
  delay(1000);
 data.servo=90;
 data.motor=0;
}

void loop()
{
  int s_v=analogRead(A2);
  int s_s=map(s_v,0,1023,0,180);
  data.servo=s_s;

  int m_v=analogRead(A1);
  int m_s=map(m_v,0,1023,0,255);
  data.motor=m_s;

  myRadio.write(&data, sizeof(data));
  Serial.print("\nPackage:");
  Serial.print(data.servo);
  Serial.print("\n");
  Serial.println(data.motor);
  delay(100);
}
Resever
#include <Servo.h>
#include <SPI.h>
#include "RF24.h"
Servo myservo;
RF24 myRadio (7, 8);
const long timeout = 1000;
int flag=0;
struct package
{
  int servo;
  int motor;
};

byte addresses[][6] = {"0"};


typedef struct package Package;
Package data;

void setup()
{
  myservo.attach(5);
  pinMode(3, OUTPUT);
  pinMode(6, OUTPUT);
  Serial.begin(9600);
  delay(1000);
  myRadio.begin();
  myRadio.setChannel(115);
  myRadio.setPALevel(RF24_PA_MAX);
  myRadio.setDataRate( RF24_250KBPS );
  myRadio.openReadingPipe(1, addresses[0]);
  myRadio.setRetries(15, 15);
  myRadio.startListening();
  data.servo = 94;
  data.motor = 0;
  myservo.write(data.servo);
  analogWrite(3, data.motor);
  analogWrite(6, data.motor);
}


void loop()
{
    flag=0;
    long time=millis();
    while((time+timeout)>millis())
    {
      if ( myRadio.available())
        {
    flag=1;
    myRadio.read( &data, sizeof(data) );
    int sss = map(data.servo, 0, 180, 55, 115);
    myservo.write(sss);
    int r = map(data.motor, 125, 0, 0, 255);
    int d = map(data.motor, 125, 255, 0, 255);
    if (r < 0)r = 0; if (d < 0)d = 0;
    analogWrite(6, r);
    analogWrite(3, d);
    Serial.print(data.servo);
    Serial.print(" ");
    Serial.print(r);
    Serial.print(" ");
    Serial.println(d);
    Serial.println("----------------------");
        }
    }
    if (flag==0)
    {
      Serial.println("No data");
      myservo.write(94);
      analogWrite(3, 0);
      analogWrite(6, 0);
    }
}